
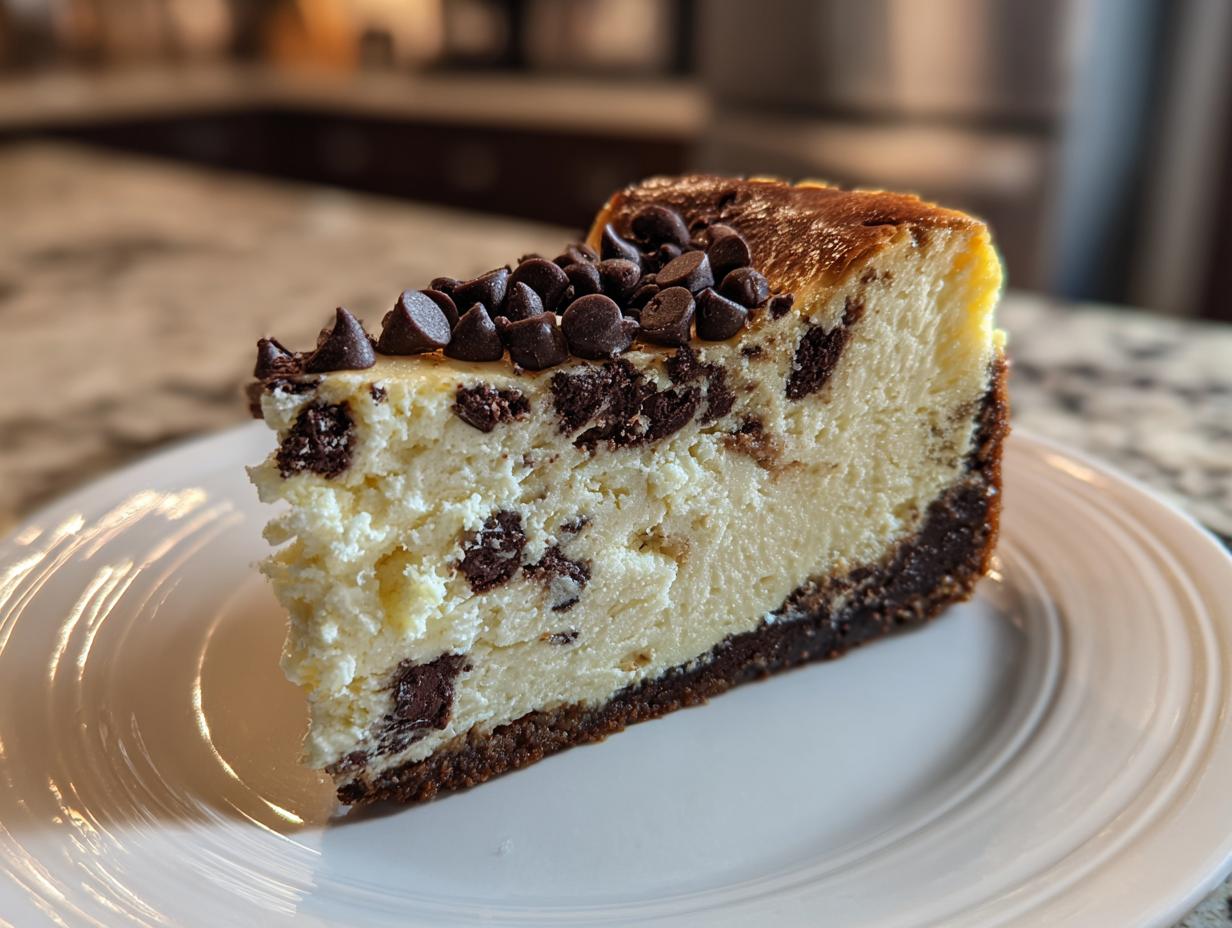
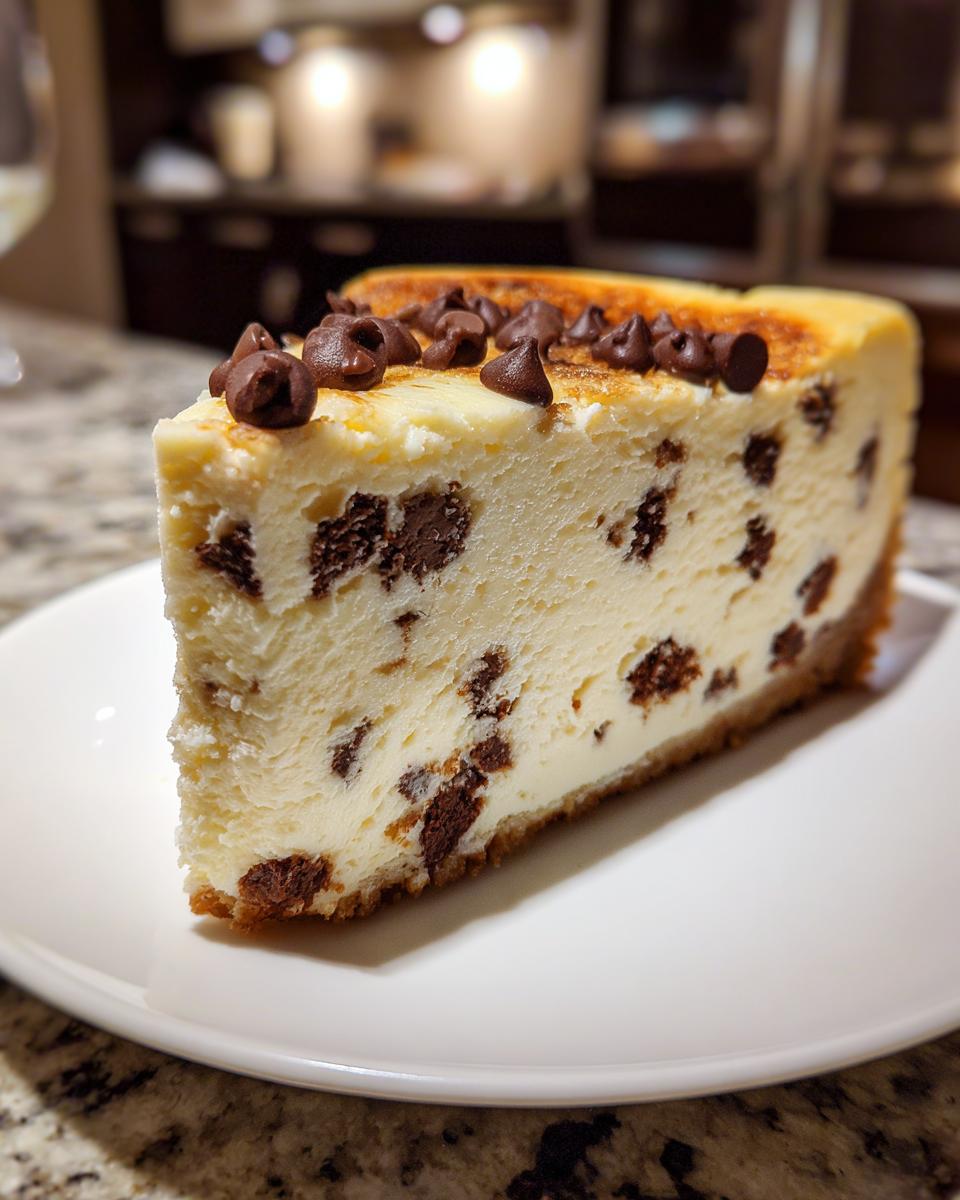
Oh, let’s be real—sometimes you just need that perfect, decadent bite of something truly indulgent, right? If your craving is screaming for something smooth, rich, and loaded with gooey melted chocolate, then stop what you’re doing! Today, I am so thrilled to share my absolute favorite recipe for a chocolate chip cheesecake that tastes like it came straight from a high-end bakery, but I promise you, it’s totally manageable in your own kitchen. This isn’t just another dessert; it’s the gooey, creamy payoff you deserve after a long week. Coming from a background in Food Science, I obsessively test recipes to ensure they are reliable. This method removes all the usual cheesecake guesswork, giving you that signature silky texture every single time. If you love this cheesecake, you absolutely have to check out my recipe for cream cheese chocolate chip cookies too! Trust me, this homemade chocolate chip cheesecake will become your new holiday favorite!
- Why This Creamy Chocolate Chip Cheesecake Recipe Works (Mia’s Expert Take)
- Gathering Ingredients for Your Chocolate Chip Cheesecake
- Step-by-Step Instructions for Easy Cheesecake Recipe
- Tips for Success: Achieving Bakery Style Chocolate Chip Cheesecake
- Variations: From Cheesecake to Chocolate Chip Cheesecake Bars Recipe
- Serving Suggestions for Your Decadent Cheesecake
- Storage and Reheating Instructions for Chocolate Chip Cheesecake
- Frequently Asked Questions About This Chocolate Chip Cheesecake
- Nutritional Estimates for This Rich Dessert
Why This Creamy Chocolate Chip Cheesecake Recipe Works (Mia’s Expert Take)
I spent years trying to get cheesecake right after leaving professional kitchens. I’ve dealt with collapsed centers and grainy textures more times than I care to admit! What sets this creamy cheesecake apart is ditching shortcuts and leaning into the science behind a truly decadent cheesecake. When I first started developing this recipe, my goal wasn’t just to mimic a bakery version; it was to make it foolproof for home cooks. The magic isn’t just in the rich cream cheese, though that helps! It’s all about temperature control and moisture management.
My breakthrough moment came when I finally stopped rushing the slow cooling process. That hour letting the cheesecake rest in the turned-off oven? That’s pure graduate-level technique that stops the temperature shock that causes those awful cracks. It’s worth every second of waiting!
Key Elements for the Best Chocolate Chip Cheesecake
- The water bath (or *bain-marie*) is non-negotiable! It keeps the edges from baking too fast, ensuring that uniformly smooth texture.
- Always use completely room temperature cream cheese and eggs; cold ingredients create lumps, trust me on this one.
- Mix the eggs in slowly and stop stirring the *second* they disappear. Over-beating incorporates air, which causes sinking later.
- That slow cool-down in the oven is your safety net against cracking. You can read more about using gentle heat application in my post about custard tips, which uses some similar principles!
Gathering Ingredients for Your Chocolate Chip Cheesecake
Okay, now that we’ve talked about the science, let’s look at what we actually need to make this incredible dessert. Remember, for cheesecake, ingredient quality and temperature are huge! I always lay everything out on the counter about an hour before I plan to start mixing. This recipe is straightforward, but having everything ready makes the process feel completely stress-free, which is my goal for you!
Crust Ingredients: Graham Cracker Crust Cheesecake Base
We start simple for the base of our graham cracker crust cheesecake. You just need something sturdy to hold all that creamy filling! Don’t use too much butter or it gets greasy, trust me. Here’s what goes into that crisp layer:
- 1 1/2 cups graham cracker crumbs
- 1/4 cup granulated sugar (for crust)
- 6 tablespoons unsalted butter, melted
Filling Ingredients for Rich Cream Cheese Dessert
This is where the decadence really comes in. When you look at this list for our rich cream cheese dessert, ensure those cream cheese blocks have been sitting out! They need to be perfectly pliable so they mix without any lumps. The vanilla and salt wake up the flavor beautifully.
- 3 (8 ounce) packages cream cheese, softened
- 1 1/2 cups granulated sugar (for filling)
- 1 teaspoon vanilla extract
- 1/4 teaspoon salt
- 4 large eggs
- 1 cup semi-sweet chocolate chips
Step-by-Step Instructions for Easy Cheesecake Recipe
This is the part where we bring it all together! Don’t let the water bath scare you; it’s the secret handshake for a perfect easy cheesecake recipe, and once you see how simple it is, you’ll never skip it. Getting these steps right ensures your chocolate chip cheesecake bakes beautifully flat and tastes spectacularly smooth. Grab your mixer, and let’s make magic!
Preparing and Pre-baking the Crust
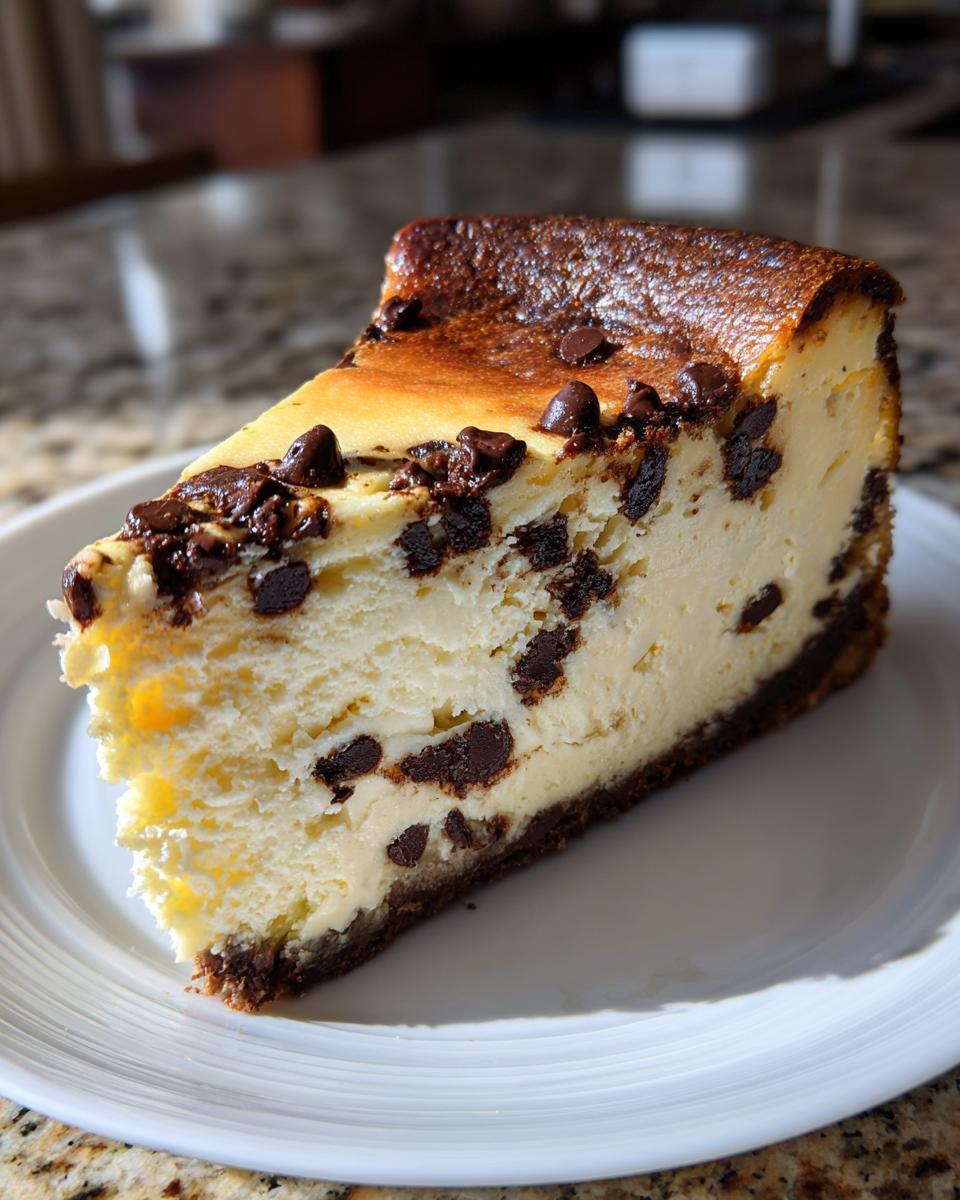
First things first, get that oven warming up to 325 degrees Fahrenheit. While it heats, you need to tackle the pan prep, and this is vital for our water bath later! Take a 9-inch springform pan and wrap the outside *very* tightly with heavy-duty aluminum foil—I mean, give it two or three good layers. This stops sneaky water from seeping in and ruining that lovely crust we just made. Once wrapped, mix your graham cracker crumbs, 1/4 cup of sugar, and the melted butter until it looks like damp sand. Press this mixture firmly onto the bottom of your foil-wrapped pan. Pop that into the preheating oven for just 10 minutes to set it, then pull it out to cool while you make the filling.
Mixing the Creamy Cheesecake Filling
Now for the creamy part! In a large bowl, beat that softened cream cheese until it’s completely smooth and lump-free. Slowly mix in the remaining 1 1/2 cups of sugar, plus the vanilla and salt, just until they look uniform. This is the most important warning I can give you: When you add the eggs, add them one at a time, mixing on low speed *just* until the yolk vanishes. Why? If you overmix after the eggs go in, you whip in air. Air expands, creating bubbles, and bubbles equal cracks later! Keep it slow and low. Once the eggs are incorporated perfectly, gently fold in those chocolate chips. Don’t use the electric mixer for the chocolate chips!
Baking the Chocolate Chip Cheesecake with Water Bath
Pour that gorgeous filling mixture right over your slightly cooled crust. Now, set your foil-wrapped springform pan inside a larger roasting pan—this is our water bath setup! Carefully pour hot water into the *roasting pan* until the water level comes halfway up the sides of the cheesecake pan. This steam bath is what guarantees a creamy cheesecake texture by keeping the oven humid. Slide the whole setup into the oven and bake it for about 55 to 65 minutes. You’re looking for the edges to be set, but the very center should still have a little wobble, like slightly set Jell-O.
Cooling and Chilling for Perfect Texture
We don’t just yank this baby out when it’s done—that’s recipe for disaster! Once the baking time is up, turn the oven off completely. Prop the oven door open a crack—use a wooden spoon if you need to—and just let the cheesecake sit in that cooling oven for a full hour. This gradual temperature drop is key for any good baked cheesecake. After that hour, remove it from the water bath and foil, let it cool on a wire rack on the counter until it hits room temperature, and then, the hardest part: chill it! It needs at least six hours in the fridge, but honestly, letting it chill overnight makes all the difference in the world for the final set.
If you’re looking for a simple bread recipe to pair with dessert, check out my steps for making easy moist pumpkin bread!
Tips for Success: Achieving Bakery Style Chocolate Chip Cheesecake
When you are aiming for that perfect, smooth, bakery style dessert finish, the difference is usually in the details nobody talks about! We covered the water bath, which is huge, but let’s talk about troubleshooting the tiny things that can throw off your beautiful chocolate chip cheesecake. Most of my kitchen failures came from trying to rush something that requires just a little patience. Remember how I mentioned in the notes to use room temperature ingredients? That’s actually tip number one for preventing lumps and ensuring we get that incredible, rich texture we’re aiming for.
If your filling ever seems to get grainy, it’s almost always because the cream cheese or eggs were too cold when they hit the mixer. When cold cheese tries to blend with sugar, it clumps up, and even high-powered mixers can’t fully smooth those out later. Similarly, cold eggs shock the batter, leading to a slightly uneven bake.
Here’s one substitution tip I learned when I ran out of semi-sweet: I tried using dark chocolate chips, and wow! The slightly more bitter note cut through the richness of the cream cheese perfectly. It made it even more decadent, though maybe less traditional. If you need topping inspiration after you master the bake, my stable vanilla buttercream frosting recipe works surprisingly well as a light topping for a cheesecake slice!
Handling Temperature: Room Temp Ingredients Matter
Seriously, just take your cream cheese and eggs out about an hour or two before you plan on mixing. For the cream cheese, you should be able to press a finger into it gently and leave an indent without it squishing everywhere—that’s the sweet spot. Cold ingredients don’t emulsify properly. Think of it like trying to stir cold honey into cold coffee; it just doesn’t blend smoothly. Perfect room temperature ingredients guarantee that silky, creamy cheesecake filling that melts in your mouth instead of that slightly chunky texture we hate.
Variations: From Cheesecake to Chocolate Chip Cheesecake Bars Recipe
Listen, sometimes you’ve got a crowd coming over, or maybe you just don’t have the patience for a big, fancy round cake to chill. That’s when we pivot! While this recipe is tailored for that perfect baked cheesecake wheel, the search interest for easier formats is huge, which is why I know so many of you are looking for the cheesecake bars recipe!
It’s so simple to take this exact filling and turn it into a shareable sheet treat. If you love that easy cleanup and portability, you should absolutely look into how to adapt this base into bars. I’ve included my thoughts on how to make some other fantastic bar treats, like these snickerdoodle blondies, in another post. But for this recipe, you just spread the filling into a 9×13 inch pan instead of a springform. You’ll need to watch the baking time though—it goes quicker, probably needing only about 35 to 40 minutes. When they come out, chill them just the same, then cut into squares. It’s the perfect party dessert idea!
Making a No Bake Cheesecake Alternative
Now, if you’re looking to avoid the oven entirely, we can certainly pull off a fun, frozen treat. For a complete no bake cheesecake, you’ll want to swap out that graham cracker base for an Oreo crust—crush those cookies, mix with a little melted butter, and press it into the bottom of your pan (no pre-baking necessary!). For the filling, you’d skip the eggs and the baking steps completely. Instead, you need to make sure your cream cheese is super smooth, and you might want to add a touch more sugar or even a stabilizer like a bit of melted white chocolate or heavy cream whipped stiffly, just to help it set up firm in the fridge. Chill that mixture for at least eight hours, or until it’s totally firm, and you have a lovely alternative ready to go! If you want to see a great baked bar version, check out this recipe for chocolate chip cheesecake bars!
Serving Suggestions for Your Decadent Cheesecake
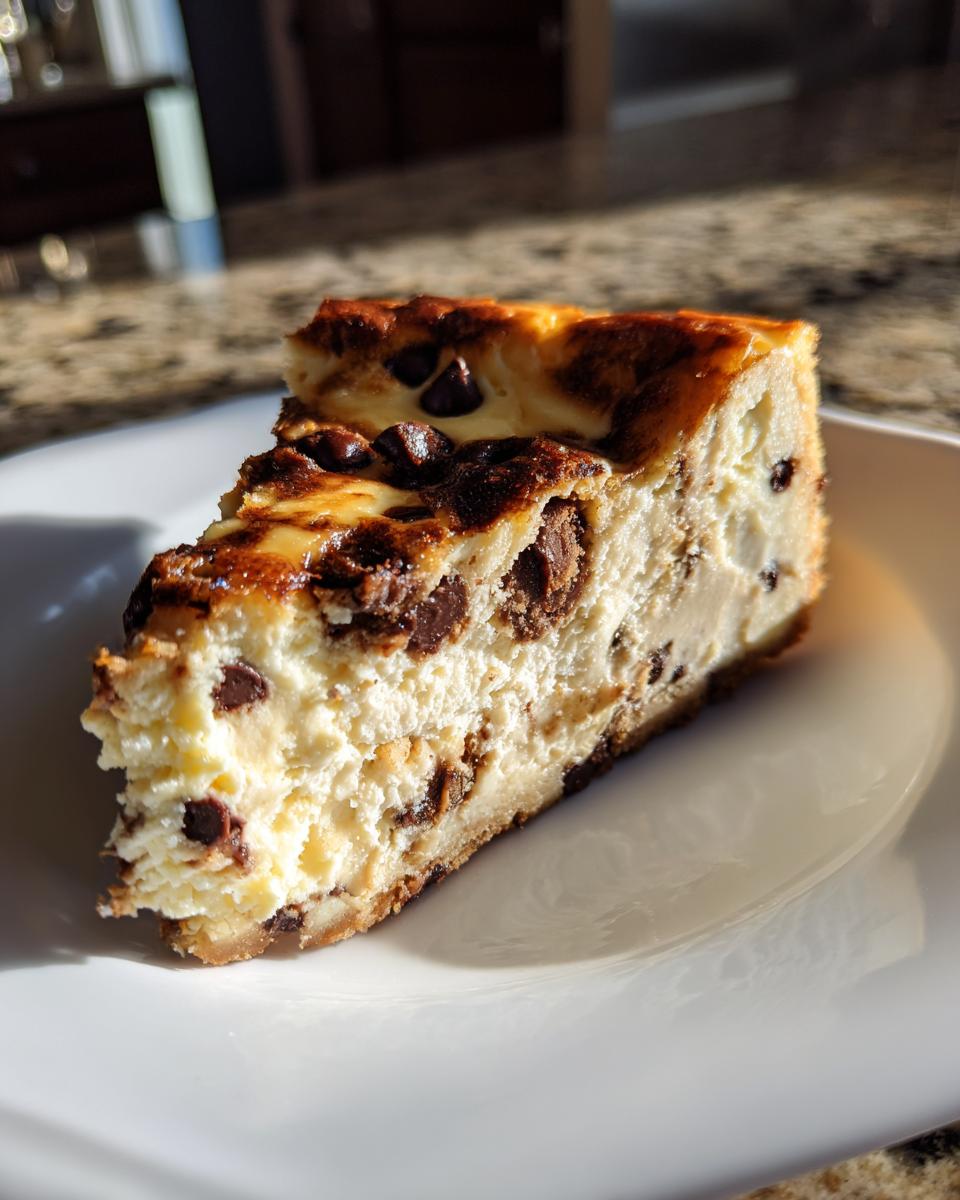
Once that beauty is perfectly chilled and ready to serve, the fun really begins! This decadent cheesecake is so rich on its own that it truly stands up as the ultimate dessert mashup, but a few simple additions can turn it into a showstopper for your next event. Presentation is everything, especially when you’re serving something this special for your party dessert ideas.
For an extra layer of texture, I love crumbling a few chocolate wafer cookies around the base of the serving platter. If you’ve got extra chocolate chips, a small sprinkle just before serving gives it that fresh, melty look. If you want to add a fruity contrast—which really brightens up the richness—a quick raspberry coulis poured sparingly around the plate is divine. Or, if you’re feeling extra ambitious, you can whip up a quick, light topping! I rarely add a heavy frosting because the filling is so perfect, but a dollop of my easy chocolate mousse on the side is heaven.
Remember, this cheesecake is already complete harmony; anything you add should just complement the creamy chocolate chip goodness, not hide it!
Storage and Reheating Instructions for Chocolate Chip Cheesecake
Alright, say you managed to save some of this amazing chocolate chip cheesecake—which, honestly, is a feat in itself! Proper storage is crucial because we want those leftovers to taste just as fresh and creamy as the first slice. You absolutely cannot skip the chilling time. Remember I stressed letting it chill for a minimum of six hours? That’s the baseline. For the best possible slice, especially for a rich cream cheese dessert like this, I always recommend letting it chill in the refrigerator overnight. It firms up beautifully, and the flavors really marry together.
When storing leftovers, keep the cheesecake tightly covered in the springform pan if you still have the ring, or transfer slices to an airtight container. Covered tightly, this baked cheesecake stays good in the fridge for about four to five days. That’s usually long enough for me to finish it off!
Now, about reheating—and this is where my Food Science background kicks in, so listen closely! Cheesecake is a custard-based dessert, and custard really hates being heated up again. If you try to reheat a slice, you risk the delicate cream cheese structure collapsing and becoming soupy or grainy. So, my firm advice is: Don’t reheat it. Period. If you pull a slice out of the fridge, let it sit on the counter for about 15 to 20 minutes before serving. That slight warming lets the texture soften just a tiny bit while keeping that perfect, cold stability. It’s the best way to enjoy every creamy bite without ruining the texture!
Frequently Asked Questions About This Chocolate Chip Cheesecake
Got questions brewing after all that delicious talk? I totally get it! When you’re making something as indulgent as this ultimate chocolate chip dessert, you want to get it right. I’ve pulled together the most common things people ask me about achieving that perfect, bakery-quality result at home. My training in Food Science helps me explain the tricky parts, so don’t stress; we’re covering all the bases here to make sure your cheesecake recipe turns out perfectly! If you need ideas on how to make other main dishes taste just as intentional, check out my tips on the best chicken marinade!
Can I really skip the water bath, or is it truly necessary?
Oh, honey, please don’t skip it! I know it seems like an extra hassle for an easy cheesecake recipe, but seriously, the water bath is your best friend here. It creates a steamy, gentle environment around the pan, ensuring the cheesecake bakes evenly from edge to center without drying out or cracking. If you skip it, you risk a dry perimeter and a sunken middle. We are aiming for that creamy, smooth finish, not a crater!
What kind of chocolate chips give the best result in this creamy cheesecake?
I developed this recipe using semi-sweet chips because they provide a nice, complex contrast to the sweet, tangy cream cheese. However, I usually tell people to use what they love! If you are a big fan of milk chocolate, go for it—it will be sweeter, making the dessert taste even richer. If you want less intense sweetness, use bittersweet chips. Just make sure they are good quality chips because, unlike a cookie, they are a major player in the final flavor profile!
I’m worried about sinking or cracking; how do I prevent it?
That fear is real, I promise! The sinking and cracking are almost always related to temperature shock or over-mixing. First, ensure your ingredients are room temperature so they mix smoothly. Second, and this is crucial for a perfect baked cheesecake, follow the cooling instructions exactly: turn the oven off, leave the door cracked, and let it linger in there for an hour. This slow temp change is the secret to keeping that top perfectly flat. If you want to see some other impressive results using precise cooking methods, take a peek at my all-time favorite chocolate chip cheesecake recipes shared by others!
Can I use fresh cream cheese instead of the brick style?
No, I definitely wouldn’t recommend it for this specific recipe. When we talk about a rich cream cheese dessert, we rely on the structure of the brick-style, full-fat block cream cheese (like Philadelphia). Fresh cream cheese, the kind that comes in tubs, has far too much liquid added to it. That extra water throws off the balance of the recipe and guarantees a soupy, unset final product.
What’s the best way to get a clean slice for serving?
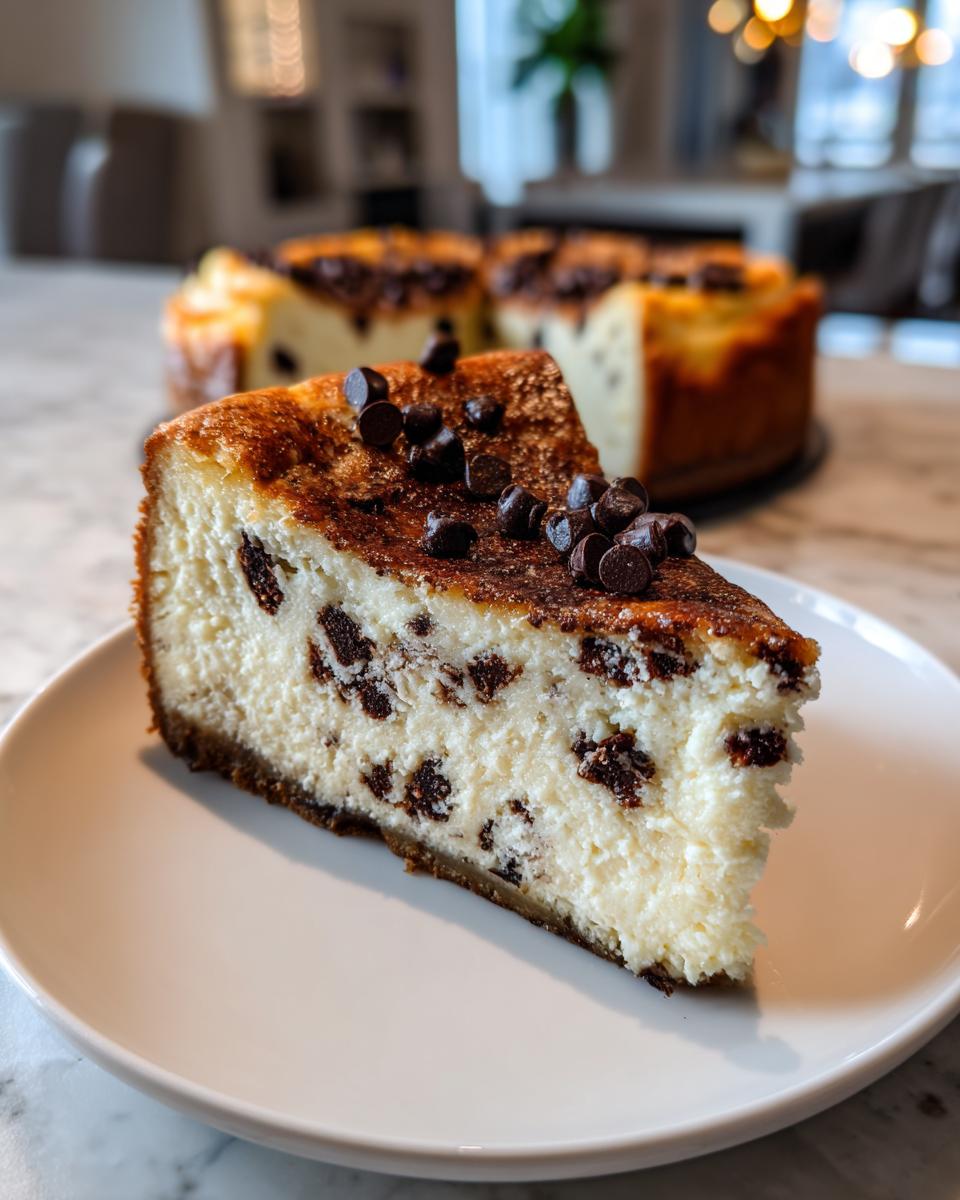
A clean slice is the hallmark of a good presentation! First, you *must* chill it overnight. Second, use a hot knife. Heat a long, thin chef’s knife under very hot water until it’s steaming, dry it quickly, and then, slice through the cheesecake. Wipe the knife clean and reheat it for every single slice you cut. It sounds tedious, but it melts through the filling beautifully and gives you that gorgeous, clean cut for serving at your next event!
Nutritional Estimates for This Rich Dessert
Now, I always like to add a quick note on the nutrition because, coming from a Food Science background, I appreciate all the details! However, please remember that these numbers are just an estimate. Since we’re dealing with a homemade, decadent cheesecake loaded with cream cheese and chocolate chips, these estimates are based on the recipe yielding 12 generous slices, as noted above. If you slice it thinner, of course, the numbers change!
This is an indulgent dessert, so view this chocolate chip cheesecake as a treat for special occasions, not an everyday snack—though I certainly wouldn’t blame you if you snuck a bite! Here’s the breakdown per serving:
- Serving Size: 1 slice
- Calories: 450
- Fat: 30g (Saturated Fat: 18g)
- Carbohydrates: 40g
- Sugar: 35g
- Protein: 8g
Keep these slices covered tightly in the fridge, and they hold up wonderfully for those last-minute cravings!
PrintCreamy Chocolate Chip Cheesecake Recipe
Make this rich, creamy chocolate chip cheesecake at home. This baked dessert features a smooth cream cheese filling loaded with chocolate chips, offering a bakery-style treat that is easy to prepare for any party or special occasion.
- Prep Time: 25 min
- Cook Time: 65 min
- Total Time: 7 hr 30 min
- Yield: 12 servings 1x
- Category: Dessert
- Method: Baking
- Cuisine: American
- Diet: Vegetarian
Ingredients
- 1 1/2 cups graham cracker crumbs
- 1/4 cup granulated sugar (for crust)
- 6 tablespoons unsalted butter, melted
- 3 (8 ounce) packages cream cheese, softened
- 1 1/2 cups granulated sugar (for filling)
- 1 teaspoon vanilla extract
- 1/4 teaspoon salt
- 4 large eggs
- 1 cup semi-sweet chocolate chips
Instructions
- Preheat your oven to 325 degrees Fahrenheit. Wrap the outside of a 9-inch springform pan tightly with heavy-duty aluminum foil.
- Prepare the crust: Combine graham cracker crumbs, 1/4 cup sugar, and melted butter in a bowl. Press the mixture firmly into the bottom of the prepared springform pan. Bake for 10 minutes. Remove from oven and let cool slightly.
- Prepare the filling: In a large bowl, beat the softened cream cheese with an electric mixer until smooth. Gradually add 1 1/2 cups sugar, vanilla extract, and salt. Beat until just combined.
- Add eggs one at a time, mixing on low speed after each addition until the yolk disappears into the batter. Do not overmix.
- Gently fold in the chocolate chips. Pour the filling over the cooled crust.
- Place the foil-wrapped springform pan into a larger roasting pan. Carefully pour hot water into the roasting pan until the water reaches halfway up the sides of the springform pan (this is a water bath).
- Bake for 55 to 65 minutes, or until the edges are set but the center still jiggles slightly.
- Turn off the oven, crack the oven door open, and let the cheesecake cool inside the oven for 1 hour. This prevents cracking.
- Remove the cheesecake from the water bath and foil. Cool completely on a wire rack. Chill in the refrigerator for at least 6 hours, preferably overnight, before serving.
Notes
- For a no-bake version, use an Oreo crust recipe and chill the filling mixture for at least 8 hours.
- If you prefer chocolate chip cheesecake bars, press the crust into a 9×13 inch pan and bake the filling for 35-40 minutes.
- Use room temperature cream cheese and eggs for the smoothest filling texture.
Nutrition
- Serving Size: 1 slice
- Calories: 450
- Sugar: 35g
- Sodium: 250mg
- Fat: 30g
- Saturated Fat: 18g
- Unsaturated Fat: 12g
- Trans Fat: 0.5g
- Carbohydrates: 40g
- Fiber: 1g
- Protein: 8g
- Cholesterol: 95mg