
Oh, I absolutely adore taking a classic treat and giving it a little kick, don’t you? My favorite childhood indulgence was always the creamy peanut butter goodness of a traditional buckeye candy. But let’s be honest, sometimes you want that flavor profile without all the rolling and chilling required for the balls.
That’s where this genius, super simple recipe comes in! We’re combining that nostalgic flavor with the satisfying crunch of a pantry staple to create the best **buckeye graham crackers** you’ve ever tasted. Seriously, these are no-bake magic, and they come together faster than you can say “peanut butter and chocolate.” As someone who loves turning family favorites into something new—it’s what I do best over at Cooking by Mia—I can guarantee this mashup works perfectly. Get ready for your new favorite quick snack!
- Why You Will Love These Buckeye Graham Crackers (Easy No Bake Peanut Butter Chocolate Treats)
- Essential Ingredients for Perfect Buckeye Graham Crackers
- How to Assemble Your No Bake Buckeye Graham Cracker Sandwiches
- Mastering the Chocolate Dip for Your Buckeye Graham Crackers
- Tips for Success with Crunchy Chocolate Peanut Butter Treats
- Storage and Make-Ahead Options for Buckeye Graham Crackers
- Variations on Your Easy Graham Cracker Desserts
- Frequently Asked Questions About Buckeye Graham Crackers
- Nutrition Snapshot for Homemade Buckeye Graham Crackers
Why You Will Love These Buckeye Graham Crackers (Easy No Bake Peanut Butter Chocolate Treats)
I promise you, these aren’t going to last long once you put them out. They hit all the right notes for a quick, satisfying snack!
- They are truly **No Bake Peanut Butter Chocolate Treats**—no oven time means less fuss, less heat in the kitchen, and a much faster payoff!
- You get that incredible contrast: the creamy filling mashed against the satisfying crunch of the graham cracker base.
- Assembly is insanely easy; you can even get the kids involved in making these **Simple Peanut Butter Candy Remix** bites.
- They are perfect for last-minute hosting; once they chill, they are ready for the party tray! You can find more grab-and-go ideas over at my appetizers and snacks page.
Essential Ingredients for Perfect Buckeye Graham Crackers
Since this recipe is mostly assembly, the quality of what you start with sets the entire tone! Don’t skimp here; these simple ingredients are doing some heavy lifting flavor-wise. We are aiming for that classic flavor profile you expect from homemade peanut butter candy, but with a little more structural integrity thanks to the cracker.
Here is what you need to grab before we tackle the filling and the dip. I’ve linked my favorite peanut butter dip recipe if you’re looking for something different to snack on while these set up!
- 1 cup creamy peanut butter (This is non-negotiable for that smooth filling!)
- 1/2 cup unsalted butter, softened (Make sure it’s truly soft so it blends perfectly with the peanut butter.)
- 3 cups powdered sugar (Yes, three cups! That’s how we get that perfect dense, sweet structure.)
- 1 teaspoon vanilla extract
- 1 bag (12 ounces) semi-sweet chocolate chips (My personal favorite, but milk or dark work beautifully too.)
- 2 tablespoons shortening or coconut oil (This is our secret weapon for a smooth melt, trust me.)
- 24 graham crackers, whole sheets (We need exactly 24 to make 12 sturdy sandwiches!)
See? It’s a handful of pantry staples that turn into something really special. For an extra kick in the filling, you can check out how I layer nutty flavors in my Peanut Butter Dip recipe sometime!
How to Assemble Your No Bake Buckeye Graham Cracker Sandwiches
Alright, this is where the fun really starts—we get to make our creamy filling and start stacking! Since we aren’t baking anything, the texture of this center layer is everything. We need it smooth enough to spread but firm enough to hold up when we dip it later. If your filling seems too stiff at this stage, don’t panic! A tiny splash of milk, maybe half a teaspoon, usually loosens it up perfectly while you mix. I learned that trick testing out the sturdiness for my easy lunch recipes—sometimes you just need that extra moisture!
Preparing the Creamy Peanut Butter Filling
Grab your mixing bowl. We need that softened butter and the creamy peanut butter to get acquainted first. Beat those two together until they look light, fluffy, and totally combined. Remember, if the butter is cold, you’ll end up with tiny hard lumps instead of that beautiful base texture we want. Once these two are merged, slowly mix in that vanilla extract, and then start adding the powdered sugar one cup at a time. Keep mixing until everything is smooth and well combined. You shouldn’t see any dry pockets of sugar, just rich, sweet peanut butter goodness throughout.
Assembling and Chilling the Buckeye Graham Crackers
Now we build the heart of our treat! Lay out your parchment-lined sheet. Take one graham cracker sheet and spread a good, generous layer of that peanut butter filling across the top. Don’t be shy here—we want a hearty layer! Place a second graham cracker right on top to make a sandwich. You should get 12 of these delicious sandwiches total. Once they are all stacked up, they need a vacation! Pop the whole sheet into the freezer for at least 30 minutes. This chilling step is crucial because if the filling is too soft, it will ooze right out when we try to dip them in that warm chocolate later. Patience pays off, trust me!
Mastering the Chocolate Dip for Your Buckeye Graham Crackers
Okay, we’ve got our sturdy, chilled peanut butter sandwiches ready to transform into the superstars of the snack world! This is where we turn them into true **Buckeye Graham Crackers**. The secret to that glossy, perfect chocolate shell isn’t just the chocolate chips themselves, but what you mix in. I always add a little bit of shortening or coconut oil—you saw it in the ingredients list! This tiny bit of fat prevents the chocolate from seizing up and ensures it dries shatteringly smooth once it hits the air. It’s the same trick I use for my famous chocolate mousse to keep that silky texture!
Melting Chocolate Correctly
We aren’t using a double boiler here because we are keeping things quick! Put your chocolate chips and that shortening right into a microwave-safe bowl. Now, listen closely: microwave it in short bursts, like 30 seconds at a time. After every 30 seconds, pull it out and stir it really well, even if it looks like nothing has changed. Chocolate burns super fast if you aren’t careful, and melted burnt chocolate tastes… well, terrible. Keep stirring and heating until it’s just barely smooth. That residual heat will melt the last tiny bits as you stir.
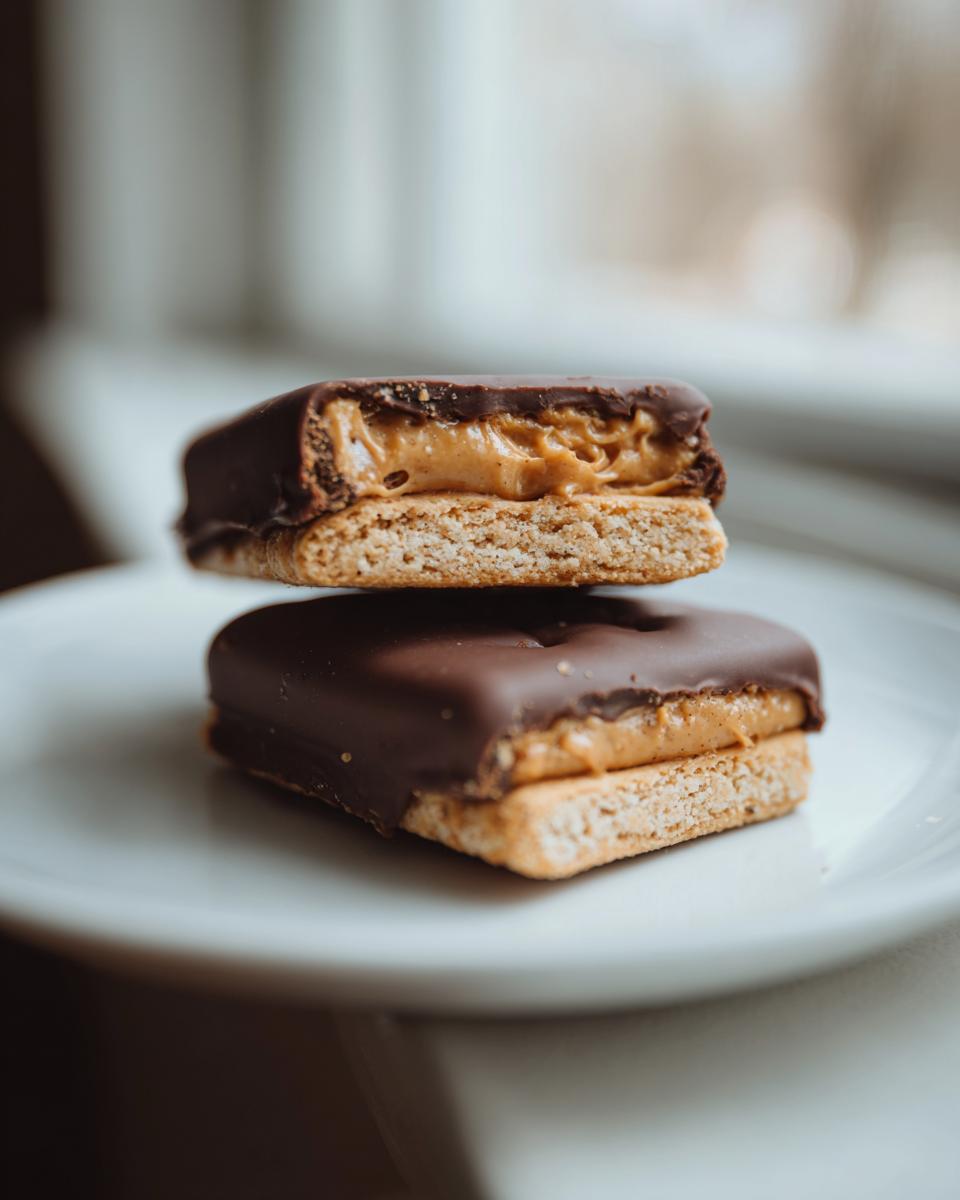
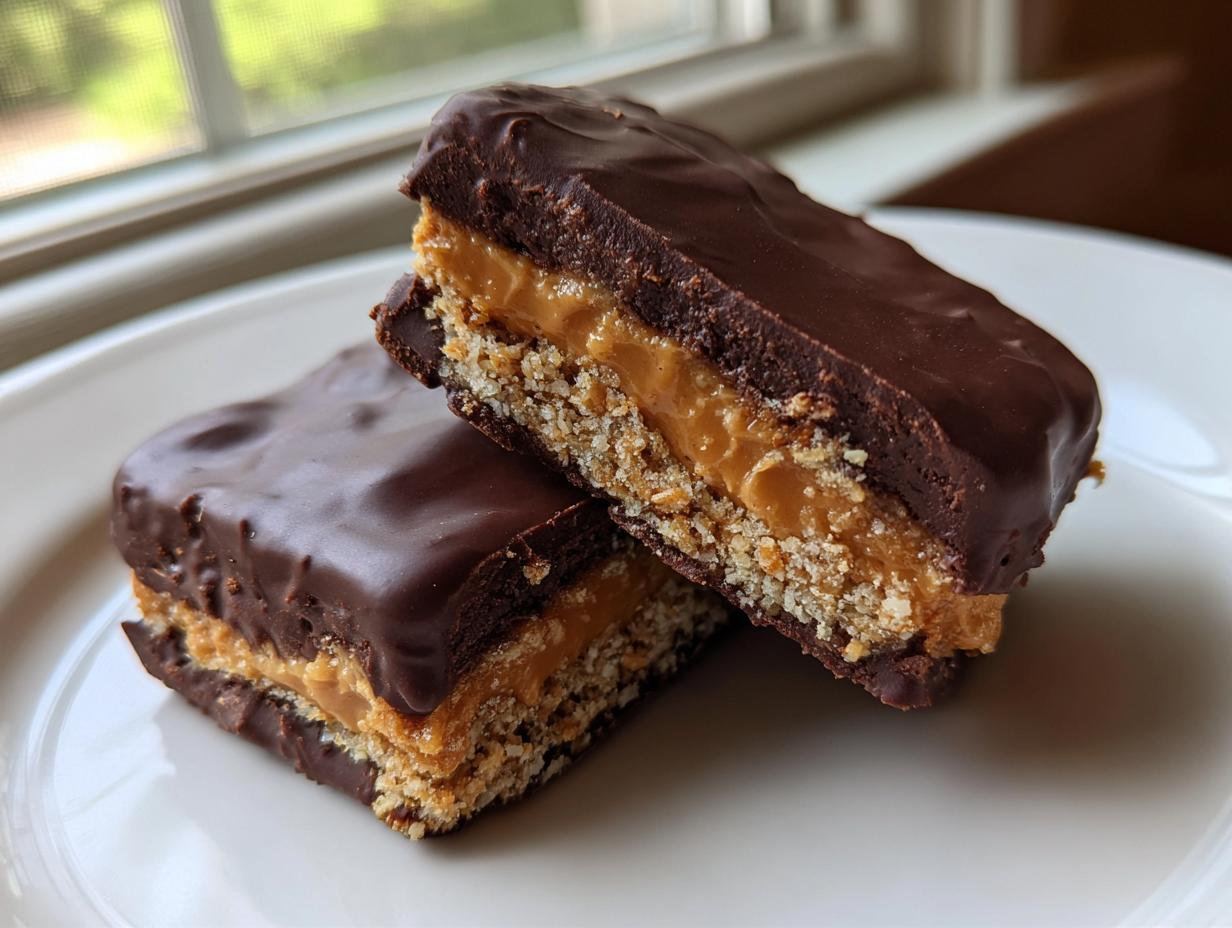
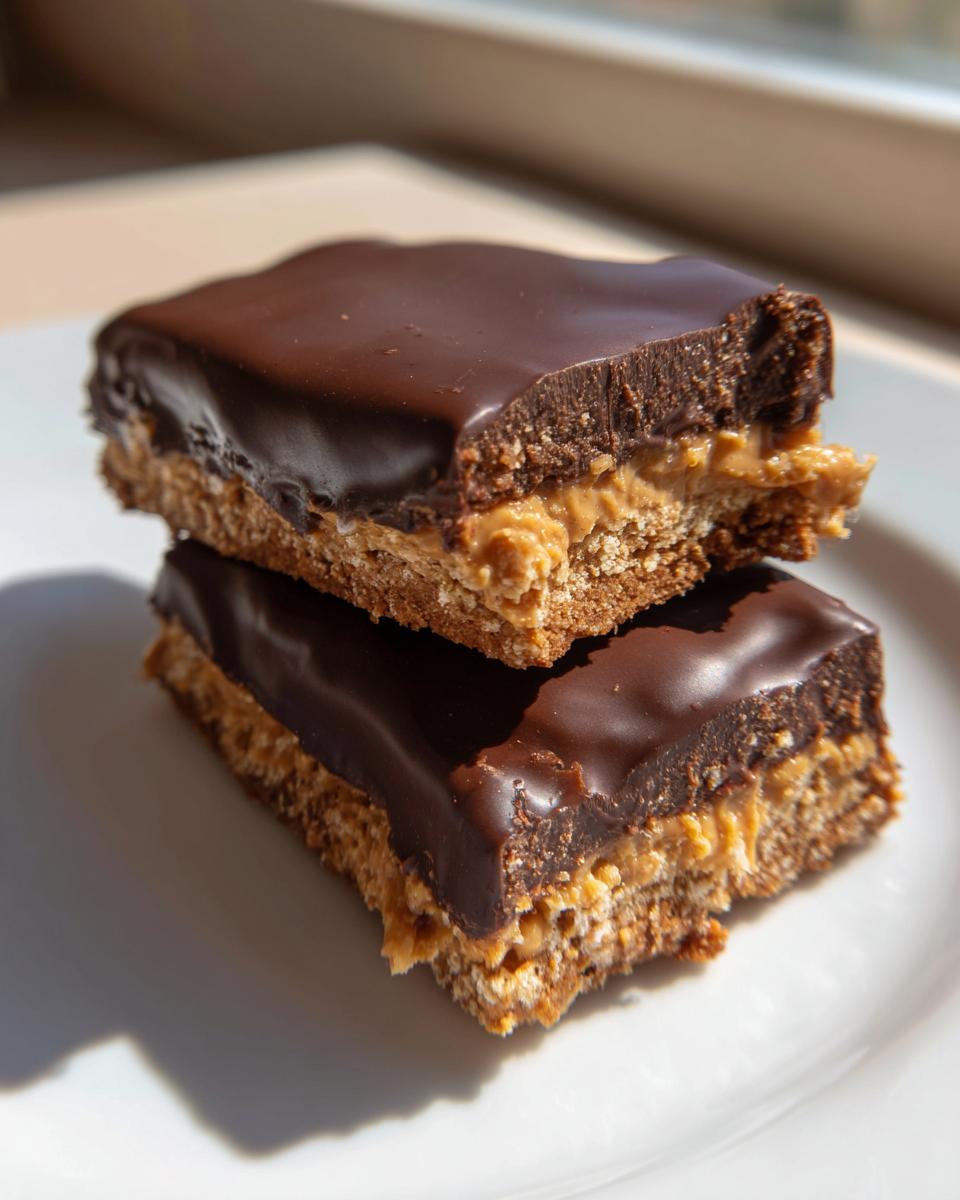
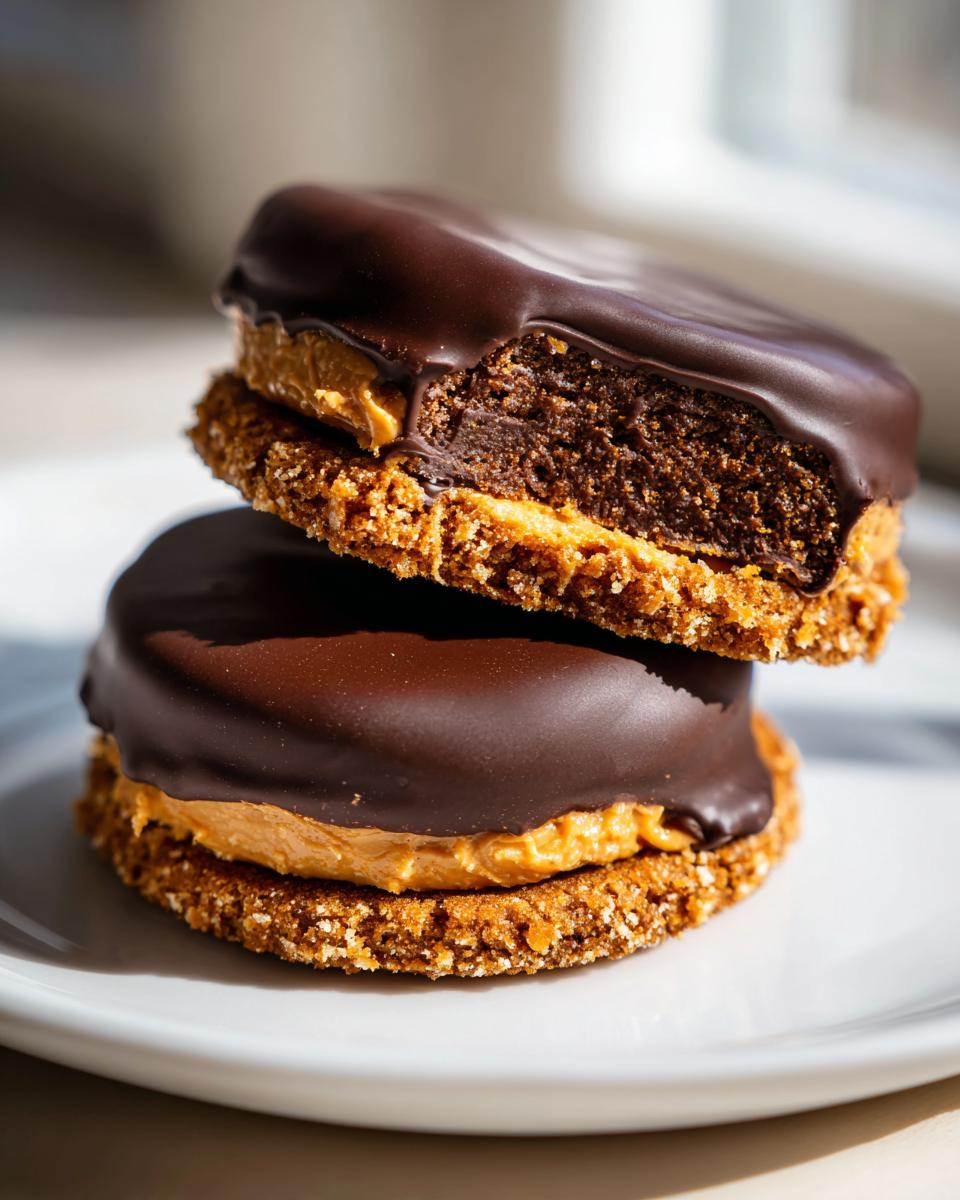
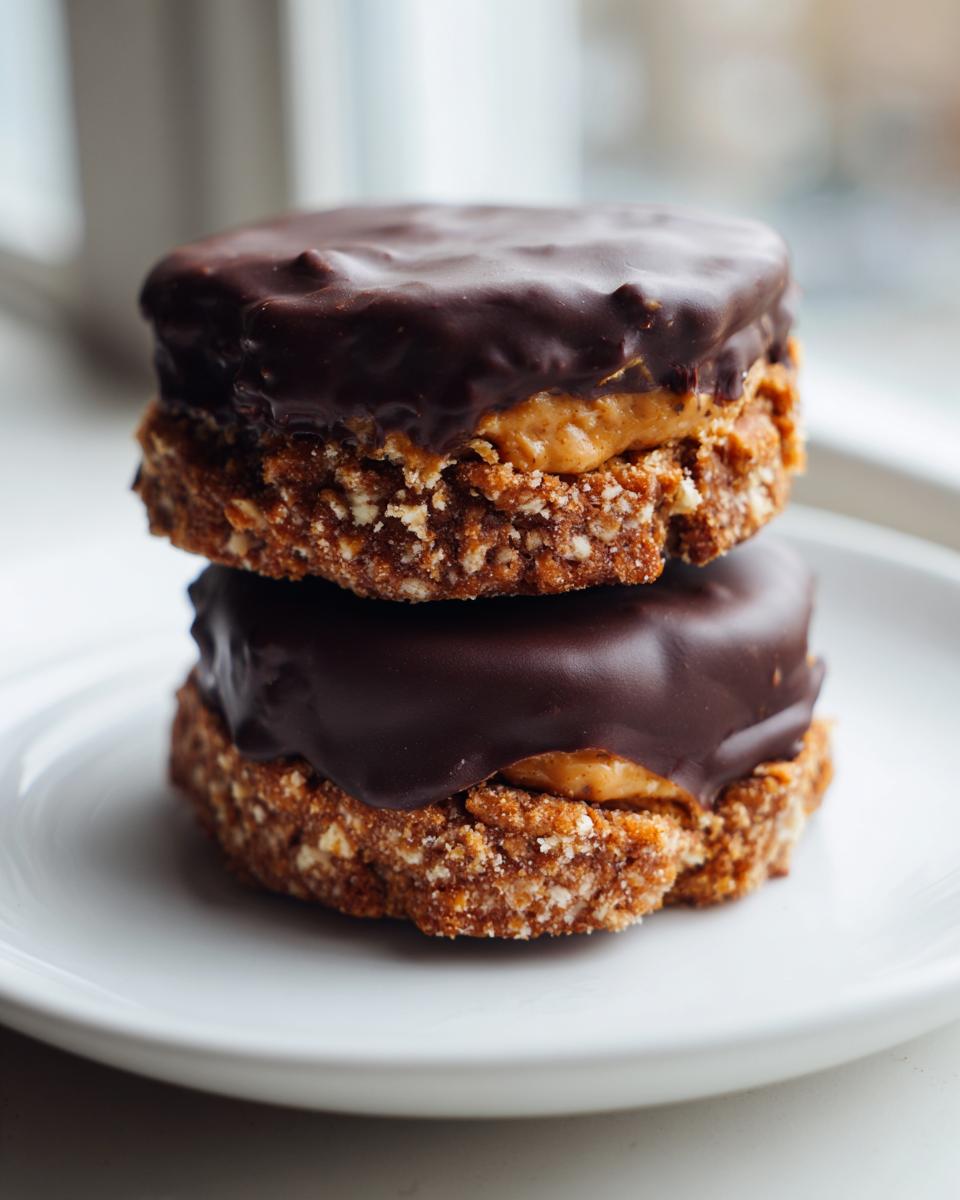
The Signature Buckeye Graham Crackers Dip Technique
Time for the signature move! Pull those firm cracker sandwiches out of the freezer. You want to dip each one gently into the warm chocolate. Here’s the art: you’re trying to coat almost the entire sandwich, but leave a little border—a small window—showing the pale peanut butter filling peeking through. That little peek is what makes them look exactly like the classic buckeye candy! Once dipped, place them back on your parchment paper. We let them set up completely now; you can leave them on the counter for about 15 minutes or pop them back in the fridge for 10 if you are in a hurry.
Tips for Success with Crunchy Chocolate Peanut Butter Treats
Because a recipe this simple has very few moving parts, paying attention to detail makes all the difference between a good treat and an absolute showstopper. I’ve made these **Crunchy Chocolate Peanut Butter Treats** more times than I can count, usually when I need a quick batch for a neighborhood cookout, and I’ve learned a few tricks along the way to ensure maximum flavor and the best appearance!
Here are my top tips to elevate your experience:
- Don’t Skip the Extra Salt: Since we are using standard creamy peanut butter (which is usually salted, but not aggressively so), I highly recommend grinding a tiny pinch of flaky sea salt right over the peanut butter filling *before* you put the top graham cracker on. That little salty bite cuts through the intense sweetness of the filling and the chocolate, making the whole thing taste more complex.
- Temper Your Crackers: This sounds fancy, but it’s just keeping things cold! If your kitchen is warm when you start dipping, the graham crackers can start to get soft from the heat of the filling or the warm chocolate. If you notice any sogginess, quickly place the sandwiches back in the freezer for five minutes right before you dip them. A cold cracker equals a better, crunchier final bite.
- Use High-Quality Chocolate: Since the melted chocolate is one of the three main flavors here, don’t grab the cheapest store brand if you can avoid it. I find that chips made with real chocolate (check the ingredients to make sure they don’t list too much vegetable oil first) coat much better and have a richer flavor. It really makes these **Peanut Butter Chocolate Graham Bars** worth the effort.
- Perfecting the Peek: If you want that signature look where just the right amount of peanut butter peak shows, use a fork or a toothpick after you dip. While the chocolate is still wet, gently hold the side of the cracker with the tool and use a small offset spatula or the edge of a butter knife to wipe away any excess chocolate globs clinging to the bottom edge. This cleans up the appearance beautifully. It reminds me of how I clean up the edges on my cream cheese cookies when I want them to look professional!
Storage and Make-Ahead Options for Buckeye Graham Crackers
One of the best things about these incredible **Buckeye Graham Crackers** is that they are freezer-friendly! If you’re making these for a big holiday tray or just want to stock up on easy snacks for the week, you absolutely can prepare them ahead of time. Once the chocolate has fully set, transfer your finished treats into a large airtight container.
I recommend placing a layer of wax paper or parchment between layers of the crackers just to make sure that rich chocolate coating doesn’t stick to the next layer during storage. Believe it or not, these beauties keep beautifully in the refrigerator for up to a week, but my favorite way to preserve them is the freezer. They can last up to three months frozen! Just pull them out about 20 minutes before you plan to serve them. For more amazing sweets, check out all my tested dessert recipes.
Variations on Your Easy Graham Cracker Desserts
While the classic peanut butter, semi-sweet chocolate, and honey graham cracker combination is absolutely perfect—it is, after all, a classic for a reason—I always encourage my readers to tinker! That’s what makes home cooking so rewarding, right? We’re already taking a foundational recipe and giving it a fun twist, so why stop there?
These **Easy Graham Cracker Desserts** are truly adaptable. You don’t need another whole recipe; just small swaps can completely change the vibe of the treat. Here are a couple of my favorite adjustments when I’m getting bored with the standard lineup:
- Go Darker with the Chocolate: If you aren’t much for super sweet desserts, swap those semi-sweet chips for a high-quality dark chocolate—like 65% cacao content or even deeper. The slight bitterness of the dark chocolate really stands up to the sweet peanut butter filling beautifully. It feels way more grown-up, though the kids still gobble them up just as fast! For another idea revolving around deeper sweetness, you absolutely have to try my maple brown sugar cookies sometime.
- A Sprinkle of Spice in the Filling: To mimic that traditional buckeye *candy* flavor even more closely, try adding just a tiny pinch of cinnamon or even a whisper of unsalted butter instead of the shortening/coconut oil when melting your chocolate. Wait, scratch that—let’s keep the shortening for texture, but instead, add a fourth cup of powdered sugar that has been mixed with a quarter teaspoon of instant espresso powder right into your peanut butter filling. It deepens that chocolate flavor even when only the peanut butter layer is showing!
- Swap the Cracker Base (Carefully!): This one is tricky because the graham cracker gives us that perfect sturdy base, but if you need a different flavor or texture, you can try using vanilla wafers, provided they are large enough to sandwich. You must cut the peanut butter layer thinner for these, though, because the wafers are usually smaller and don’t absorb moisture like a graham cracker does.
Mixing up the coating is the easiest way to keep this recipe fresh batch after batch!
Frequently Asked Questions About Buckeye Graham Crackers
I get tons of questions about scaling these up for school parties or exactly how crunchy these **Peanut Butter Chocolate Graham Bars** end up being! If you have more questions after reading the recipe, check below. If you still can’t find what you need, feel free to reach out to me directly at my contact page!
Can I use crunchy peanut butter in this Buckeye Graham Crackers recipe?
Oh, you totally can! That’s a great way to add even more texture to these **Kid Friendly No Bake Snacks**. The only thing you’ll notice is that the peanut butter filling won’t be quite as uniformly smooth. You’ll have little delightful peanut pieces scattered throughout the filling layer. It still works perfectly for assembly and chilling, but it definitely changes the mouthfeel from the super-creamy version I wrote up.
Are these Peanut Butter Chocolate Graham Bars safe for school lunches?
Because these are no-bake and super sturdy once chilled, they hold up wonderfully in a lunchbox—no melting or crumbling like some frosted cookies might! They are excellent **Simple Peanut Butter Candy Remix** treats for kids. However, and this is important, you absolutely must check your specific school’s policy first. We know a lot of schools are peanut-free these days due to allergies, so always double-check before packing them!
What is the best way to get a smooth chocolate coating?
The key to that mirror-like, smooth finish is twofold, and we covered both points in the main instructions! First, you absolutely must add that little bit of shortening or coconut oil to your chocolate chips. It lowers the viscosity so it flows better and dries silkier, rather than hard and chalky. Second, make sure you stir constantly when melting it in the microwave and stop heating the second you see those chocolate chips turn liquid. Residual heat will finish the job perfectly; overheating is what makes the chocolate thick and clumpy on the cracker.
Nutrition Snapshot for Homemade Buckeye Graham Crackers
When I develop recipes, especially quick treats like these **Buckeye Graham Crackers**, I always run the numbers just to give us a general idea of what we’re snacking on. Remember, since we are using pantry staples and making them by hand, these figures are just great estimates based on standard ingredient measurements. If you swap out peanut butter types or use dark chocolate, those numbers will shift a bit! If you’re looking for my favorite ways to balance out a big dessert day, check out my go-to healthy breakfast recipes.
- Serving Size: 1 sandwich
- Calories: 380
- Sugar: 35g
- Fat: 22g
- Carbohydrates: 42g
- Protein: 7g
This snapshot is based on the standard recipe yield of 12 servings. Enjoy them! Knowing the basics helps us appreciate the indulgence even more.
PrintEasy No-Bake Buckeye Graham Crackers

Make these simple, no-bake Buckeye Graham Crackers that combine crunchy graham crackers, creamy peanut butter filling, and a rich chocolate coating. This recipe is quick to assemble and perfect for parties or family snacks.
- Prep Time: 20 min
- Cook Time: 5 min
- Total Time: 25 min
- Yield: 12 servings 1x
- Category: Dessert
- Method: No Bake
- Cuisine: American
- Diet: Vegetarian
Ingredients
- 1 cup creamy peanut butter
- 1/2 cup unsalted butter, softened
- 3 cups powdered sugar
- 1 teaspoon vanilla extract
- 1 bag (12 ounces) semi-sweet chocolate chips
- 2 tablespoons shortening or coconut oil
- 24 graham crackers, whole sheets
Instructions
- Line a baking sheet with parchment paper.
- In a medium bowl, combine the peanut butter, softened butter, powdered sugar, and vanilla extract. Mix with a hand mixer or sturdy spoon until the mixture is smooth and well combined. This is your peanut butter filling.
- Place one whole graham cracker on your work surface. Spread a generous layer of the peanut butter filling onto the graham cracker. Top with a second graham cracker to create a sandwich. Repeat until all graham crackers are used, creating 12 sandwiches.
- Place the assembled sandwiches on the prepared baking sheet. Place the sheet in the freezer for at least 30 minutes to firm up the filling.
- While the sandwiches chill, prepare the chocolate coating. In a microwave-safe bowl, combine the chocolate chips and shortening (or coconut oil). Microwave in 30-second intervals, stirring well after each interval, until the chocolate is completely smooth.
- Remove the chilled graham cracker sandwiches from the freezer. Dip each sandwich into the melted chocolate, ensuring most of the sides are coated, leaving a small circle of the peanut butter filling exposed at the top, similar to a traditional buckeye candy.
- Place the dipped crackers back onto the parchment-lined sheet.
- Allow the chocolate to set completely at room temperature, or place the sheet back in the refrigerator for 10 minutes for faster setting.
- Store the finished Buckeye Graham Crackers in an airtight container.
Notes
- For a cleaner dip, use a toothpick to gently guide the chocolate around the edges of the sandwich.
- You can substitute milk chocolate or dark chocolate for the semi-sweet chips based on your preference.
- These treats are excellent for making ahead and freeze well for up to three months.
Nutrition
- Serving Size: 1 sandwich
- Calories: 380
- Sugar: 35
- Sodium: 180
- Fat: 22
- Saturated Fat: 9
- Unsaturated Fat: 13
- Trans Fat: 0
- Carbohydrates: 42
- Fiber: 1
- Protein: 7
- Cholesterol: 15